We follow standard procedural guidelines, as well as local and national standards for installing a Solar System, but in a nutshell:
- Layout
Firstly, we determine the best layout and negotiate with our clients for the best performance. When designing the layout, we will consider factors such as shading from neighbouring buildings, trees, antennas, or any other roof fixtures, such as chimneys, vents, or hot water systems.
2. Installing the panel racking and rail systems
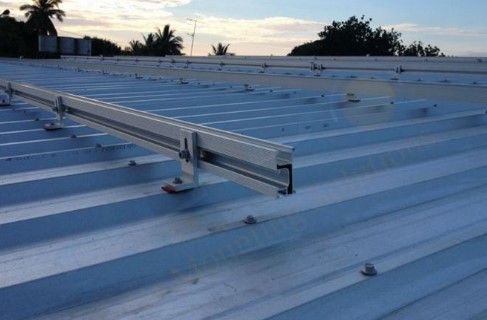
After the layout is finalised, our installers will begin to attach the racking system onto the roof. The racking system is the component that fastens the solar panels onto the roof.
Racking systems usually consists of four components: The feet, rails, joiners and clamps. But could include tilt frames, poles, or special types of mounting clips depending on the roof type and specifications of the design.
To secure the racking system onto a roof, our installers will first secure the feet. ‘Tin’ feet are used for a standard Colourbond roof while ‘Tile’feet are used for a standard cement/terracotta tile roof. For a Colourbond roof, existing screws from the corrugated iron are removed and the Tin feet are screwed into it. For cement/terracotta tiled roof, the tiles are slid upwards and the feet are then screwed onto the roof’s baton. If the roof is cliplok styled roof (or another special type) there are a range of special feet available to match the roof.
Rails are then joined onto the feet. Joiners are then attached to join the rails together.
Many companies cut their costs in the racking system they install, as this is a component that is not always seen and does not usually receive a lot of scrutiny until it fails.
At Sunrays Power, we make sure to only use racking systems that have been thoroughly tested in Australian weather conditions, are fully compliant, flexible, and made from high quality components.
3. Panels
After the rails are joined, our installers will start to lay out the panels onto the rails. Our installers will then secure the panels firmly using the mid clamps and end clamps in the proper clamping zones of the panels.
After the panels are secured in place, the panels will be connected in a series and MC4 connectors will be attached in a desired string setup. Loose panel cables are tied with stainless steel zip ties to make system look neat and to make it easier to access and repair in the future.
Our installers will then earth the panel arrays with proper earthing cables. DC isolators with weather protection cover are attached at the end of each string on the roof.
DC cable is brought down with conduit. A single penetration Dektite is used to bring strings down.
DC strings are brought down in a conduit to the inverter. DC Isolators are connected to the strings before the Inverter.
Note this is a standard installation without the use of any optimisers or microinverters. The installation of these special components will need additional work requires by the installers. To get more insight into how we install our solar systems, you might be interested in reading: How the Inverter is Installed?

